
It’s time to “go secure.”
That’s right, it’s 2017 and it’s time to convert your website over from HTTP to HTTPS.
In fact, it’s been a good idea for a while now… especially since Google announced that it would begin to use HTTPS as a ranking signal back in 2014, which meant that sites using HTTPS connections for their visitors would begin to rank better in search results than sites that don’t (all things being equal).
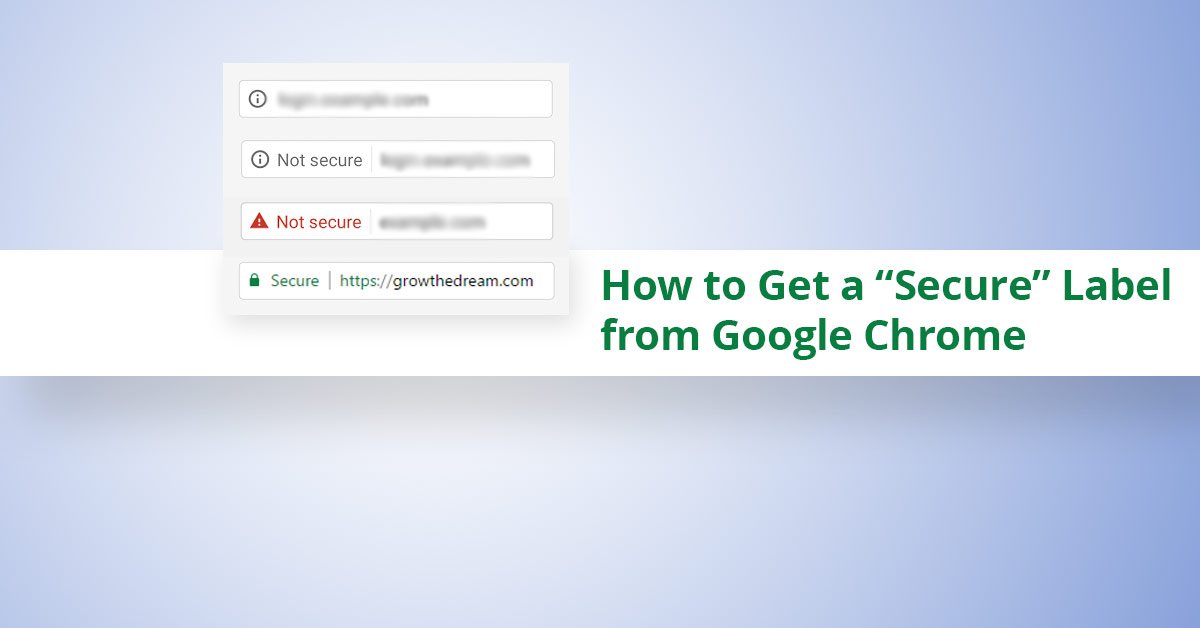
But now, Google is beginning to show visitors subtle warnings when they visit your site without an HTTPS connection. For now, it’s happening on Chrome and Android browsers, and the warnings are “soft.” But they’re going to get a lot more alarming in the not-too-distant future.
“Help! Chrome is warning people that my site is not secure!”
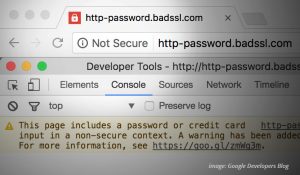 This message came from a friend over the weekend, and I can tell you that this will be happening a lot more frequently in the days ahead. For now, the “warning” is only obvious if you offer visitors the opportunity to login or enter credit card information on an “insecure” (HTTP) connection.
But it’s only a matter of time before all visitors will be shown this warning, regardless of whether you’re asking them to submit any information or not.
Which is why it’s time to offer a secure connection to your visitors and force them to use it.
What Is a Secure Connection?
On the surface, the issue comes down to the address of your site. For instance, this website used to be found at “http://GrowTheDream.com.” When we converted over to secure connections nearly 2 years ago, we no longer permitted users to connect to that address, instead requiring them to go to “https://GrowTheDream.com”
As you might expect, the “S” in “HTTPS” stands for “Secure.”
What it means is that instead of connecting using the “Hypertext Transfer Protocol,” visitors use the “Hypertext Transfer Protocol over TLS,” which is the latest update of HTTPS, formerly known as “HTTP over SSL” and “HTTP Secure.”
More importantly, it means that when visitors connect to your website, all the information passing from your site to their web browser (and back, if you ask the visitors to enter any information) is encrypted, end to end.
Naturally, for this information to be encrypted from your website and properly decrypted by the web browsers of your site’s visitors, there’s some techie magic that has to occur.
How Do I Convert from “Insecure” to “Secure” Connections for Visitors?
To change your visitors’ connections over from HTTP to HTTPS, there are a few basic requirements:
- Your webserver must support TLS (“Transport Layer Security”)
- An SSL Certificate must be issued by a recognized Certificate Authority for your website’s domain name.
- The Certificate must be installed on your webserver.
- Your webserver and website must be properly configured to force visitors to use the new HTTPS connection.
I realize this may sound like a lot, but it doesn’t have to be super complicated. In fact, depending upon what hosting company you use to host your website, it might be as simple as checking a box.
For most of us, though, there will be a few steps involved in the process. I’m going to tackle them here one at a time to make this guide as useful to you as possible.
So… where do we begin? With your hosting company!
Step 1: Check With Your Web Hosting Provider
Often, it’s worthwhile to log in to your site’s hosting account and just have a look around. You may discover something useful, such as:
You May Already Be Paying for an SSL Certificate That You Aren’t Using
Often, hosting providers offer an SSL Certificate as part of certain hosting packages. Look to see if you have a “Free” SSL Certificate (which most likely means that they’ve bundled the cost of the Certificate in with your other hosting fees).
Your Hosting Provider May Support Free SSL Certificates from Let’s Encrypt
The Let’s Encrypt project is a free and open Certificate Authority with backing from major privacy and security advocates such as the Electronic Frontier Foundation, the Mozilla Foundation, and the Linux Foundation, to name a few. By automating certain critical components of the process of issuing certificates, they are able to significantly reduce costs and offer certificates at no charge.
Many web hosting providers are getting on board with Let’s Encrypt and offering full support of their free certificates. If you are considering moving your site to different hosting, one of our favorite hosting providers, WP Engine, supports the use of Let’s Encrypt Certificates, and even takes the work out of getting your Certificate issued and installed.
One quick caveat: there are a few rare situations where a Certificate from Let’s Encrypt may not be a good idea. If you happen to host a podcast on your website, for example, you may want to avoid Let’s Encrypt Certificates for now. But for most of us, they’re a great way to go.
Does Your Web Host Support the Use of 3rd-Party Certificates?
Some hosting providers are affiliated directly with a Certificate Authority or for other reasons require that you purchase any Certificate directly from them. Before you go any further, you need to know if this is the case.
If your hosting provider has a requirement like this, you may have no alternative other than moving your hosting to a different provider.
If you aren’t sure, check your hosting provider’s support information for articles related to SSL Certificates or contact their Support Department to get your questions answered.
Step 2: Acquire Your Certificate
Note: For the purposes of this article, we’re using the traditional term, “SSL Certificate” to refer to the digital certificate that you’ll need. Technically, webservers shouldn’t be using SSL (“Secure Sockets Layer”) anymore because that technology has been superseded by the more up-to-date TLS (“Transport Layer Security”). Perhaps the most precise way to refer to them would be to call them X.509 Certificates, but by far the prevailing terminology used on the web (and consequently by web hosting providers) is “SSL Certificates.”
Your next move is to acquire a certificate. Your specific method of doing so will depend upon what you discovered in Step 1.
- If your hosting package includes an SSL Certificate, then your hosting provider will have some mechanism to “Set Up Your Certificate.” They may use a different word like “Activate” or “Request.” Some hosts require that you contact their Support department to get the ball rolling.
- If your hosting provider supports Let’s Encrypt, then you’ll need to follow the specific instructions provided, because the process will vary wildly from one host to another. (But you won’t have to pay for your certificate!)
- If your hosting provider supports 3rd Party certificates, then you may find that an Essential SSL Certificate is a cost-effective way to proceed ($29.95 as of this writing). But it’s worth confirming what your hosting provider charges, because they may offer discounted certificates.
- If your hosting provider requires that you purchase your SSL Certificate directly from them, then you’ll need to follow their instructions to do so (or switch to a new hosting provider).
A Note About the Different Types of Certificates
As soon as you go shopping for an SSL Certificate, you immediately discover that there is an entire universe of digital certificate options out there. Since the Certificate itself is nothing more than a very small text file, you may wonder why anyone would spend hundreds of dollars purchasing one.
The differences in the different types of Certificates revolve around two main factors. One is term, or the length of time your certificate is valid. Let’s Encrypt Certificates, for example, are only valid for 3 months. Other Certificates are available in 1-year, 2-year, or multi-year terms. The other major factor is the type of validation. For a visitor to your website to be confident that your site is truly secure, they want to know who is making the claim about security. The Certificate Authority is responsible to validate that you are who you claim to be.
Here’s a quick overview of the most common types of validation
- Domain Validation — Often referred to simply as “DV,” this type of validation is the most basic form of validation available. In short, the Certificate Authority must confirm that you have control of the domain name before they can issue a certificate to you. Often, this validation process involves sending an email to the official email address of the Registered Owner of the domain name. But there are other methods as well. Let’s Encrypt, for example, has a number of options that simply confirm that the request is actually originating from the server where the website is hosted, thus automating the validation component.
- Extended Validation — This type of validation goes much further and confirms information about the corporate entity or identity of the domain owner. In addition to confirming that you have control over your domain, the Certificate Authority must obtain positive proof of your identity and, if a corporate entity is the Registered Owner of the domain, your position within that entity. This process is much more involved, and the certificates are more expensive as a result. But when it’s complete, your website visitors will see a message in their browser identifying the corporate entity in addition to just a nice big padlock, so if you’re conducting significant transactions via your website, you may find this added security more attractive.
There are many other options, including so-called “Wildcard” Certificates, which are valid for more than one domain or subdomain, and the list goes on and on.
If you’re just trying to convert from HTTP to HTTPS, often the most basic (and inexpensive) Certificates will be more than sufficient.
What Happens Next?
Once you’ve gotten the ball rolling on acquiring a certificate, often you’ll find that you have some waiting to do. Unless your web hosting provider uses Let’s Encrypt, where the domain validation process (see above) is automated, then you’ll most likely have to jump through some hoops to confirm that you do have control over your domain.
Most of the time, you’ll want to just pay careful attention to the instructions you’re presented with when you request your certificate. The most common scenario, however, is that you’ll need to monitor the email address associated with your domain name. If you aren’t sure what email address that might be, it’s a good idea to search your domain name in a WHOIS lookup service (here’s one) and see what turns up.
Usually, the Domain Validation process will take no more than 24-48 hours. Sometimes, it’s even nearly instantaneous.
Step 3: Install Your Certificate
In the vast majority of cases, your web hosting provider will have to perform this step for you. If they support Let’s Encrypt, it will most likely be automated, which is another great reason to use those Certificates. If you’ve acquired your Certificate from a 3rd Party, you’ll most likely need to send it to your hosting provider for them to install. If you acquired it directly from your web host, then they’ll most likely handle this part of the process for you without much prodding from you.
If you have a “Dedicated” or “Dedicated Virtual Server,” then you may be responsible to perform this step yourself. If that’s the case, you’re most likely not in need of this article, but if you find yourself reading this and you’re in that situation and don’t know what to do, drop a note in the comments with information about who your hosting provider is and we’ll try to get you some help.
Step 4: Test
Once you’ve got reason to believe that your Certificate has been installed, give it a try! Just open up your web browser and type in your site address, but use “http://” instead of “https://” in front of the address and see what happens.
If you receive an error message, then the Certificate may not yet be installed. (It depends on the error, however, so it’s a good idea to pay attention to what the error message says.)
If your site loads up, or if it loads up but doesn’t look right, good news: you’re ready to move forward!
Step 5: Reconfigure and Redirect
Often, a website that has a newly minted SSL Certificate won’t look quite right when viewed in HTTPS mode. This is usually because there are requests for resources (e.g. images, javascript files, and other goodies that help your site look like it’s supposed to look) that are hard-coded to a specific URL. That URL often begins with “http:” and not “https:” …and that means that any modern web browser will refuse to go get those resources if you’re asking for only HTTPS stuff. At the very least, you’ll get a warning that says, “This site uses non-secure bla bla bla.”
The good news is that if you’re using WordPress (you are using WordPress, right?!), there are a few simple things you can do.
How to Configure WordPress To Use HTTPS
For starters, you’ll want to log in to the WordPress Dashboard and find your site’s “General Settings” (Settings -> General if you’re using the left-hand menu, or http://YOURDOMAINHERE.com/wp-admin/options-general.php if you feel like typing in the address) and change the WordPress Address (URL) and Site Address (URL) to reflect the new change. A word of caution: sometimes changing these values can result in problems. It’s a good idea to do this at a time when it’s OK for your site to have a few minutes of downtime just in case there’s a problem. If you can no longer access your website (or your WordPress dashboard) after you perform this step, the fix requires access to your hosting company’s Control Panel (or similar software) or contacting their support department.
Once that step has been performed, it’s a good idea to visit your site again and see what happens. I recommend using a separate web browser (where you aren’t logged in to the WordPress Dashboard, so not just a new tab or window) for this… just so you can be sure you’re seeing what regular visitors to your site will see.
If you still have images that aren’t loading properly or you see warnings about insecure content, then you might want to try one of the many SSL plugins available for WordPress. These plugins do all the heavy lifting for you of fixing any references to HTTP addresses and automatically converting them to HTTPS requests instead. I’ve tested a few of these and have had good results with WordPress HTTPS (although it hasn’t been updated in some time and so I tend to shy away from it these days) and Really Simple SSL.
If you’re using a caching plugin (like W3 Total Cache or WP Super Cache), you will definitely need to purge your site’s cache, and you may also need to reconfigure any CDN settings to be sure they’re requesting your images from valid secure locations.
From here, if your site doesn’t look right, then there are a few different rabbit holes to go down in search of the most appropriate resolution to the problem(s) you may have. In the majority of cases, however, the steps mentioned here are sufficient to get your site looking good.
In our next post, we’ll take a look at some of the follow-up steps you’ll want to take now that your site has a shiny new Certificate and working HTTPS connections!
Now my WordPress login doesnt work